
Growing Microgreens: A Superfood (video)
Presenters: April and Christa Zuniga, Eat Your Greens! Organic Farm
LMUD Garden Club/Seed Library presentation, August 31, 2026
Microgreens may be tiny, but they offer an accessible way to grow fresh, nutrient-dense food at home in very little space. During a presentation by the founders of Eat Your Greens! Organic Farm, attendees learned what makes microgreens different from sprouts and mature vegetables, why their nutritional profile has attracted scientific interest, and how to grow and harvest them at home.
The presenters’ interest in microgreens began with their own search for healthier eating habits. After incorporating microgreens into their diet, they became interested in the research behind these young plants and eventually turned that interest into a North Texas microgreens farm.
Watch the video or read below for a summary of the presentation.
What Exactly Is a Microgreen?
A microgreen isn’t a particular type of vegetable—it describes the age at which the plant is harvested. The same broccoli, kale, or radish (for example) seed planted in a garden can be grown as a sprout, microgreen, baby green, or mature vegetable depending on when it is harvested.
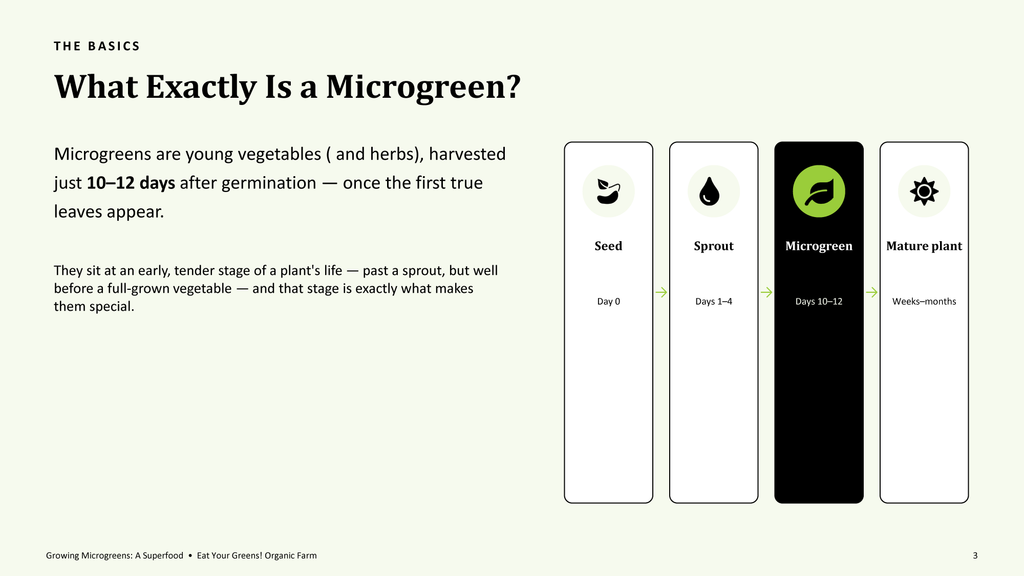
Sprouts are generally harvested within the first several days and are commonly grown in moist conditions without soil. The entire plant—including the root and seed—is eaten. Microgreens are grown in soil or another growing medium, exposed to light and usually harvested around 10–12 days for many common varieties. Only the stems and leaves are eaten. Baby greens grow for several weeks, while mature vegetables continue through the plant’s normal growth cycle.
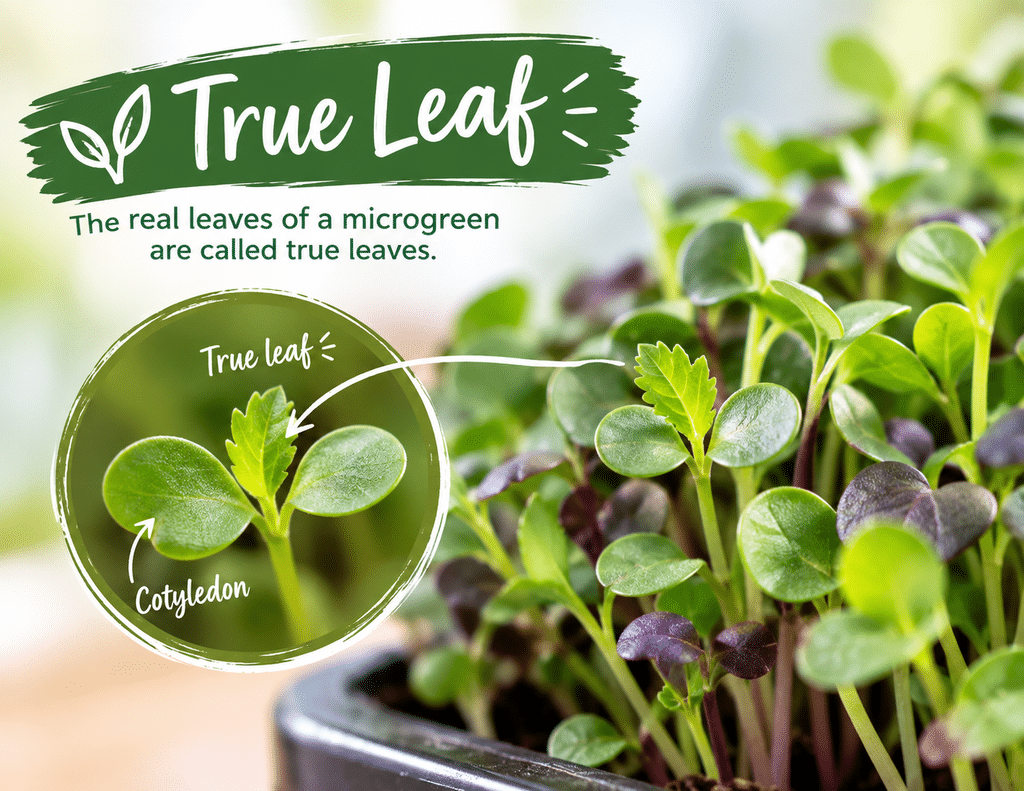
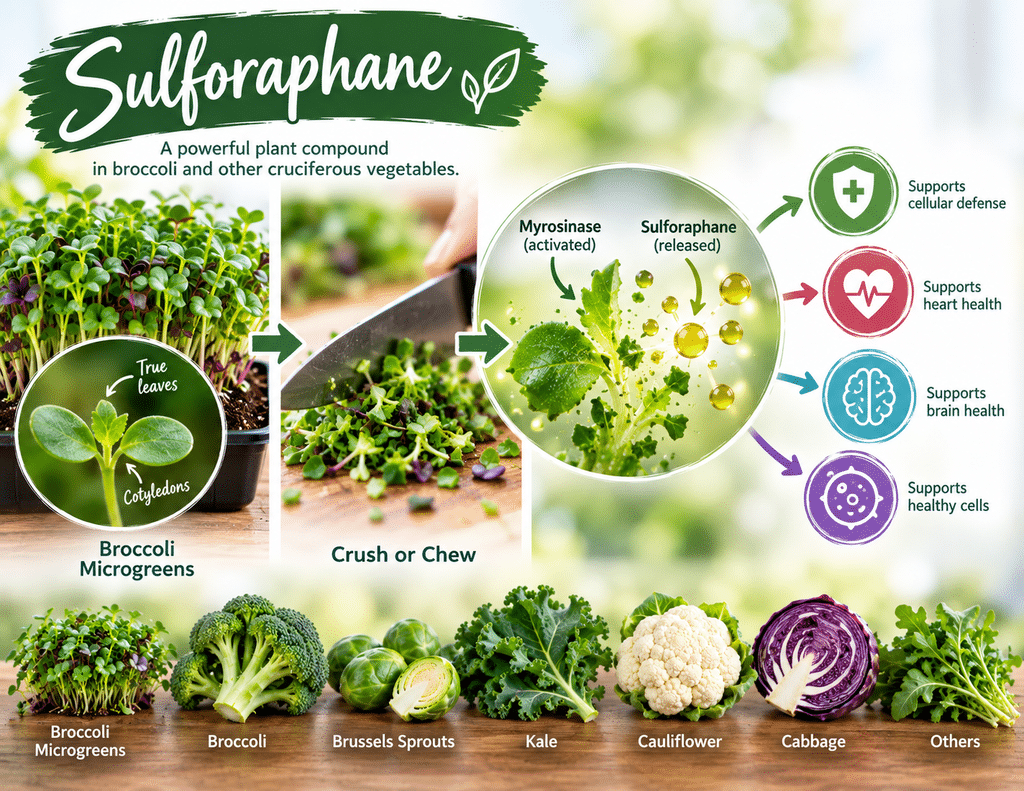
One of the most important features to recognize is the true leaf. The first two leaves that emerge are called cotyledons, or seed leaves. The plant’s first true leaf eventually appears between them. As that leaf develops, the plant begins transitioning beyond the microgreen stage. For many varieties, this is an important signal that harvest time is approaching.
Why Grow Microgreens?
Microgreens have attracted scientific interest because some varieties contain substantially higher concentrations of certain vitamins and carotenoids than their mature counterparts. Research has found considerable variation among varieties, so rather than thinking of microgreens as a replacement for mature vegetables, they can be viewed as an easy way to add another source of fresh plants and nutrients to the diet.
They’re also remarkably versatile. Broccoli and kale are mild, radish is spicy, arugula is peppery, pea shoots are sweet, and sunflower shoots have a nutty flavor. Microgreens can be eaten on sandwiches, burgers, tacos, salads, wraps, or eggs; they can also be frozen and blended into smoothies. Try adding them to soups or pasta near the end of preparation so they soften without being thoroughly cooked.

How to Grow Microgreens at Home
One of the biggest takeaways from the presentation was just how little is needed to grow microgreens. You don’t need a garden, greenhouse, or expensive equipment. A small tray on a countertop, table, or shelf can produce edible greens in roughly 10–12 days.

Step 1: Gather Your Supplies
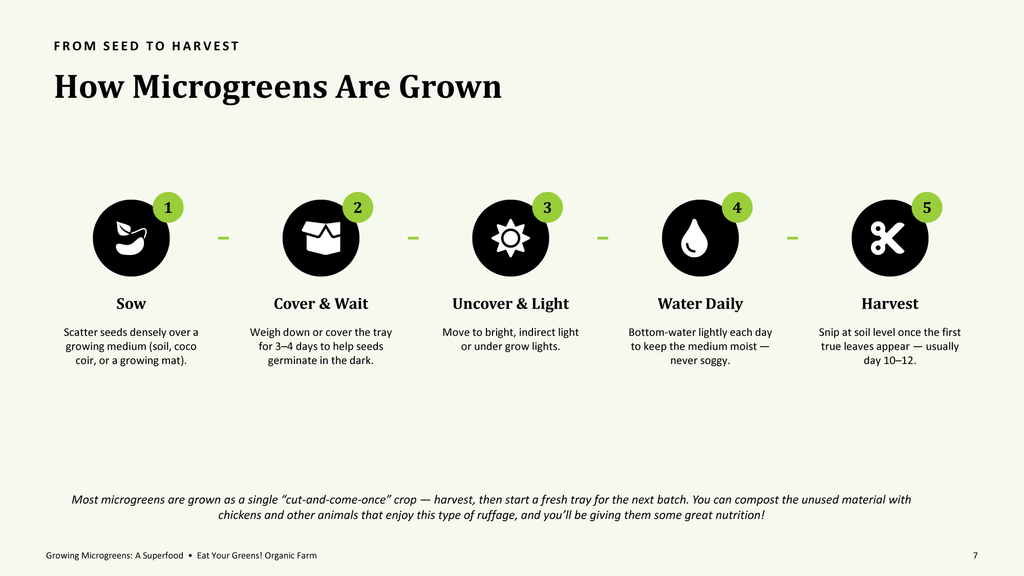
You will need two shallow trays: one with drainage holes and one without. You’ll also need quality seeds, approximately ½–1 inch of soil or another growing medium, water, a spray bottle or gentle watering source, a light source and clean scissors or a sharp knife for harvesting. A second tray and approximately 10 pounds of weight—such as a brick or heavy book—will be used during germination.
Drainage is particularly important. Microgreens need moisture, but soil that remains saturated can contribute to poor growth and disease.
Step 2: Prepare the Soil
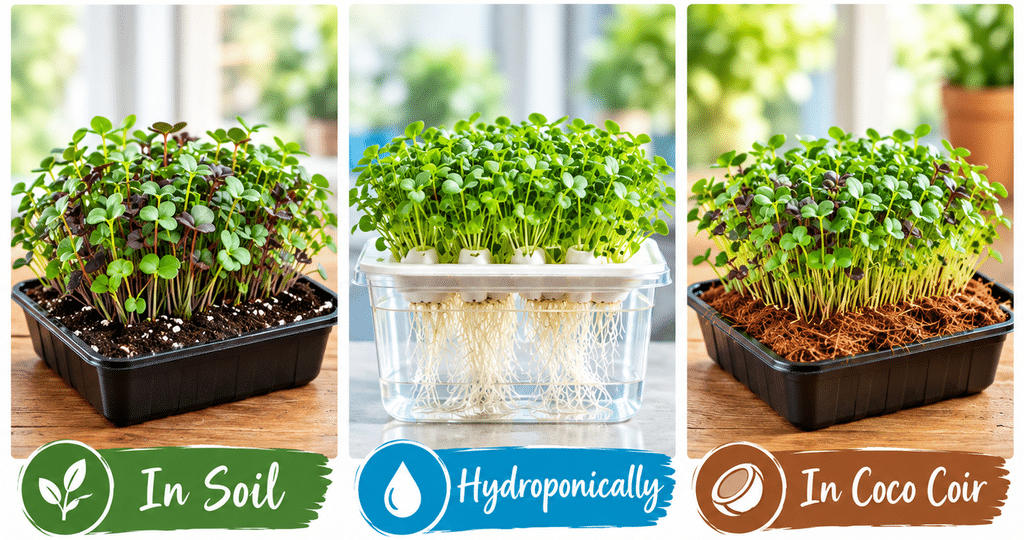
Fill the tray with drainage holes with approximately ½–1 inch of growing medium. The presenters prefer organic soil, although microgreens can also be grown hydroponically or in materials such as coco coir.
Spread the soil evenly and gently press it down to create a flat surface. This helps keep the seeds near the top of the soil and promotes more consistent growth.
Step 3: Water Before Planting
Thoroughly moisten the soil before adding the seeds. You want enough water to reach throughout the growing medium without leaving it waterlogged.
Use a gentle stream, misting attachment or spray bottle so you don’t disturb the soil. When the perforated tray is lifted, you should see evidence that moisture has reached the bottom without water continuously dripping from it.
Step 4: Sow the Seeds
Spread the seeds evenly across the soil. Microgreens are planted much more densely than vegetables grown to maturity, but the seeds shouldn’t be piled on top of one another.
Seed density varies by variety, so this may require some experimentation if you aren’t following specific growing instructions. Too many seeds can create overcrowding and moisture problems, while too few can result in a sparse stand. After sowing, lightly mist the seeds to help them remain in place.
Step 5: Cover, Weight and Leave Them Alone
Place the second tray over the planted seeds and put approximately 10 pounds of weight on top. This recreates some of the darkness and resistance seeds encounter beneath the soil, encouraging the young plants to push upward as they germinate.
For many common microgreens, leave the tray covered for approximately four days. Avoid repeatedly lifting the cover to check on them. Maintaining consistent moisture and conditions helps support germination.
Step 6: Uncover and Add Light
Around day four, remove the cover. The young plants may initially look yellow or pale because they haven’t been exposed to light. That’s normal.
Move the tray under a light source. As the seedlings receive light and photosynthesis begins, they should quickly turn green as chlorophyll develops. The presenters explained that an elaborate grow-light system isn’t necessarily required for home growing. Depending on the location, artificial household lighting or appropriate natural light may be sufficient in a well-ventilated space.
Step 7: Water Daily—but Don’t Overwater
Once the microgreens are uncovered, monitor their moisture every day. Bottom watering is a particularly useful method: pour water into the solid tray beneath the perforated growing tray and allow the roots to absorb it from below. Gentle top watering can also be used.
Microgreens like a good drink followed by an opportunity for the growing medium to begin drying. They should not sit continuously in water. The presenters recommended checking approximately 30 minutes after watering and pouring out significant water remaining in the bottom tray.
Watch the plants rather than relying entirely on a fixed amount of water. If they begin wilting or lying down, they may be getting too dry; if the soil remains constantly saturated, reduce the amount of water.
Step 8: Watch for the True Leaf
Growth can happen surprisingly quickly. Around day six, many varieties will already look like recognizable microgreens, although they generally need several more days before the ideal harvest.
Watch the center of the plant where the true leaf emerges between the two cotyledons. Temperature and growing conditions affect how quickly this happens. Warmer conditions can accelerate growth while cooler conditions can slow it, which is why the plant itself is often a better guide than simply counting days.
Step 9: Harvest Around Days 10–12
For many popular varieties, harvest occurs approximately 10–12 days after planting, although some varieties take longer. The emerging true leaf is another useful indication that it’s time to harvest.
Using clean, sharp scissors or a knife, cut the microgreens just above the soil and seed level. Eat the stems and leaves, leaving the roots, seeds and growing medium behind. You don’t have to harvest the entire tray at once; you can begin cutting portions once the greens are large enough to eat and harvest the remainder as the true leaves develop.
Step 10: Eat, Refrigerate or Freeze
Freshly harvested microgreens can generally be stored in the refrigerator for several days to about a week, depending on the variety and storage conditions. If you can’t use them while fresh, they can also be frozen for later use in smoothies, soups and sauces, where crisp texture isn’t important.
Once you’ve harvested the tray, clean reusable equipment thoroughly before planting the next crop to help prevent mold, fungi and other contamination.
Soil, Hydroponics or Coco Coir?
Microgreens can be grown several ways. Soil was the presenters’ preferred method because they find it produces strong plants with good texture and flavor. Coco coir, made from coconut fiber, provides a lightweight medium that holds moisture well. Hydroponic growing eliminates soil altogether by growing in water.
Each method can work, making microgreens an easy crop to experiment with based on available space, materials, and personal preference.
Broccoli Microgreens and Sulforaphane
Broccoli and other cruciferous vegetables—including kale, cabbage, cauliflower, Brussels sprouts, and radishes—are particularly interesting because they contain compounds involved in producing sulforaphane.
When cruciferous plant tissue is cut, crushed or chewed, an enzyme called myrosinase can interact with glucoraphanin and help form sulforaphane. This plant compound is being studied for its relationship to cellular defense pathways, oxidative stress, inflammation, and other biological processes. Research continues, so it shouldn’t be viewed as a treatment for a particular disease.
A practical takeaway from the presentation is simple: cutting, crushing, and thoroughly chewing cruciferous vegetables matters because damaging the plant tissue helps initiate the process that forms sulforaphane.
From Seed to Food in Less Than Two Weeks
Perhaps the greatest advantage of microgreens is their accessibility. They require little space, can be grown indoors year-round, and allow someone to go from planting a seed to eating something they grew themselves in roughly 10–12 days.
Start with an easier variety such as broccoli, radish, kale, or cabbage. Pay attention to seed density, moisture, drainage, light & the appearance of the true leaf, and adjust with each new tray.
In less than two weeks, a handful of seeds can become a tray of fresh greens ready to add to almost any meal.

 You are now being redirected to the WaterSmart page.